ProTools templates

If you don’t already have a standard blank template for your sessions then you should. I have a few different templates pre-built for certain times so I can start up my ProTools rig, open a session, save a copy and start working. In ProTools 8 there is native support to save a session as a template. There are a few things I like to consider when creating a session template which are –

  1. What situation would you like this template to cover?
  2. How many tracks are you likely to need?
  3. Will you need any MIDI tracks?
  4. Will any stereo tracks be needed?
  5. Are you going to need a headphone mix for the band?
  6. Do you know the processing you will be needing at mixdown? Continue reading

5.1 control room current setup

This post is a technical post describing the setup of the 5.1 control room and the capabilities of it. This isn’t a guideline as such, however it can be helpful to know what you are working with, and how it is all connected together.

This control room is centered around Pro Tools LE 8 and a 003 control surface which at the time of writing is the latest and greatest version from Digidesign, this runs on an Intel iMac with plenty of ‘grunt’ to get the job done. This Pro Tools setup isn’t your standard run of the mill install of LE 8 with limited number of tracks, plug-ins, etc there has been a lot of research and spending gone into this system. We have installed the Digidesign Pro Tools Complete Production Toolkit on this single iMac, giving you 128 mono tracks, a whole array of different mix formats, and over £1000 worth of top of the range plug-ins to name just a few of the features of this toolkit. What this means to you is that instead of being a limited cut down version of Pro Tools (or Light Edition) we are running as close to a full Pro Tools HD / TDM system as we can get without actually having Pro Tools HD / TDM. Continue reading

5.1 control room DON’TS

I’ve recently finished setting up the 5.1 surround sound control room and am writing a series of posts detailing the use of this room as there are a few guidelines which MUST be followed. This post will detail the few item which MUST NOT be done unless you want to feel the wrath of Steve (and possibly me) and also ruin usability for other students.

This list isn’t very lengthy but please follow it to ensure smooth running of this control room.

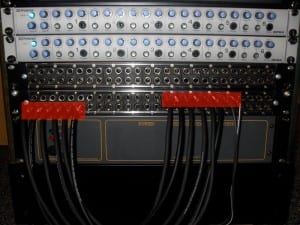
  1. Do not remove the patch leads marked red in the image under any circumstances. These are still to be hard-wired in the patch bay and are linking the outputs from the 003 control surface to the BlueSky monitor system and headphone amplifiers, if they are messed with all the I/O settings for ProTools will be messed up, and you will not get the correct output. Continue reading

5.1 control room start up guidelines

I’ve recently finished setting up the 5.1 surround sound control room and am writing a series of posts detailing the use of this room as there are a few guidelines which MUST be followed. The Pro Tools system in this control room is setup differently to the multi-track control room and has some certain guidelines that must be followed to ensure correct use.

The first thing that must be made clear is that if the system is all shut off when you come to use it there is a certain power up sequence that must be followed in order for everything to sync up correctly. The sequence for correct power up is as follows –

  1. Ensure the BlueSky remote is set to the off position (full left)
  2. DigiDesign 003 Control Surface
  3. Yamaha O2R/96 V2
  4. iMac Continue reading

Setting up the ProTools environment best practices

To get the best performance out of the ProTools environment I have found that making the following changes can be extremely beneficial for Native based systems, HD / TDM systems work in a different manner to Native systems. These instructions are for the Mac OS X version of ProTools, however the setup is the same for a Windows based system, however some of the menus may be in other places, unfortunately I don’t use Windows machines so I cannot check this. I am also using ProTools M-Powered 7.3.1 in the Native section, and ProTools 6.4 TDM in the HD / TDM section, things could be slightly different based on the version of ProTools you are using, however I have not found any major differences between LE 7 and 8 yet.

The first thing to do is start ProTools with a blank session, create a new blank session and don’t add anything to it if you need to. You should now just have the blank ProTools canvas on your screen the first thing we are going to do is to set all the buffer levels, and processing to levels that minimize the latency and provide the most power for the system. Click on Setup, and then Playback Engine, you will be greeted by a settings box for the playback engine of the interface you are using. Continue reading

Adding plug-ins to your channels

This may seem like a pretty trivial thing to do for a moderate user of ProTools, however it is something that has cropped up time and time again with new users of the software. It isn’t the most obvious of things depending on which window you are viewing, and also which layout is being used. I will demonstrate the two most common ways to add a plug-in to a channel, and also the way to get the layout to reflect mine if it does not already. I am using ProTools M-Powered 7.3.1 in these images so you may see something slightly different if you are using ProTools 8, however the techniques are exactly the same.
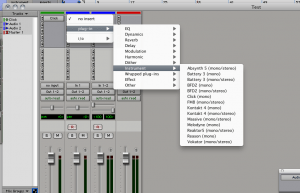
The easiest way to add a plug-in to a channel is to use the Mixer window as you can access all of the inserts, input options, output options, levels, everything related to a channel with the exception of the actual audio. With the mixer window open click on the arrow next to an insert as shown in the image.

As you can see I have chosen to add a plug-in to the Audio 1 channel which is a mono channel, if you have selected a stereo channel then you will see some slightly different options where plug-in is displayed in these menus however they are very obvious what they mean. The next thing to realize is that the plug-ins in these lists are all RTAS plug-ins, you can not add an Audiosuite plug-in directly this way and they process the track at once, not in real-time as RTAS plug-ins do. The difference is explained in another post on here so I will not go into that in this post, if you don’t understand the difference and what should be used where, please have a look at “The ProTools plug-ins mystery solved” post.

Continue reading

Audiosuite what, RTAS who? The ProTools plug-in mystery solved

When it comes to plug-ins in ProTools when using LE or M-Powered there are really only two viable options open to you, Audiosuite or RTAS plug-ins. Do you know the difference? Do you even use Audiosuite plugs? What is RTAS? Why should I care about Audiosuite? Well hopefully after reading this you will understand a little more about the differences, and when to use these powerful plug-ins and when not to.

There are actually three different types of plug-in available for ProTools software, these are Audiosuite, RTAS, and TDM. The TDM plug-ins use ProTools HD / TDM hardware which the university doesn’t have so these will not be covered in great detail. The main focus for us are the Audiosuite and RTAS plug-ins as the university has over £1000 worth of plug-ins for students to use, it’s probably best to know the differences. These Audiosuite and RTAS plug-ins are known as Native plug-ins as they use the local “native” CPU for their processing.

Continue reading

What is ProTools?

ProTools is a software based DAW made by a company called Digidesign which is part of Avid. ProTools is one of, if not the most widely used DAW in the audio industry, it is very powerful and very widely respected by many producers and engineers. Using ProTools is not like using Apple’s Logic Pro for example there is one major difference which can make or break the deal of a potential customer. To use the ProTools software you must also use an approved audio interface.

There are many different versions of the ProTools software, however there are three main groups which are –

  1. ProTools HD / TDM
  2. ProTools LE
  3. ProTools M-Powered

These three different versions all require something different to run and this difference is also reflected in how much you are willing to spend as a user vs. how much power you want out of the system. The audio interface, or interface card in HD / TDM acts as a dongle for the software, which means you will need the serial number and interface to use ProTools. Continue reading