To get the best performance out of the ProTools environment I have found that making the following changes can be extremely beneficial for Native based systems, HD / TDM systems work in a different manner to Native systems. These instructions are for the Mac OS X version of ProTools, however the setup is the same for a Windows based system, however some of the menus may be in other places, unfortunately I don’t use Windows machines so I cannot check this. I am also using ProTools M-Powered 7.3.1 in the Native section, and ProTools 6.4 TDM in the HD / TDM section, things could be slightly different based on the version of ProTools you are using, however I have not found any major differences between LE 7 and 8 yet.
The first thing to do is start ProTools with a blank session, create a new blank session and don’t add anything to it if you need to. You should now just have the blank ProTools canvas on your screen the first thing we are going to do is to set all the buffer levels, and processing to levels that minimize the latency and provide the most power for the system. Click on Setup, and then Playback Engine, you will be greeted by a settings box for the playback engine of the interface you are using.
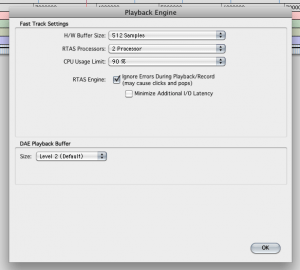
 I am using an M-Audio Fast Track interface for my M-Powered system so the settings for this are displayed in the window shown. I have my playback engine settings setup so that I have a decent balance of latency, and processing power for my system.
This system is based around a 17″ 2.8Ghz Intel Core2Duo MacBook Pro, with 4Gb RAM so I set my CPU limit to 90% to make the most of the power that is in this system, I could reduce my H/W buffer level, however when using the laptop hard-drive instead of externals you can run into errors as the drives that come with most laptops are only 5400rpm. Most external drives are 7200rpm or higher, I use Glyph 15000rpm SCSI external drives for recording, however this system is never used as a recording system, in my TDM recording system the H/W buffer is currently set to 128 Samples.
I have yet to notice any major improvement from messing with the DAE Playback Buffer so I leave this at default and have never had any issues. My advice for the playback engine is if you have the CPU power, use it! Set the CPU limit to the max you possibly can which will enable you to use more RTAS plug-ins, and more tracks at once. H/W buffer size will depend on the speed of your hard-drive but can also be affected by track count, so best to set this around 512 Samples, you may be able to get away with 256 Samples but if you start getting errors, I would recommend backing it off to 512 Samples again.
Once you are happy with settings in that section then click OK to close the window, the next place we want to go is the Properties screen, Click on ProTools “Version” next to the Apple logo, and then Preferences. Under the Operation tab ensure that Auto Backup is enabled keeping 10 most recent backups, and backup every 5min. Click OK to save the settings.
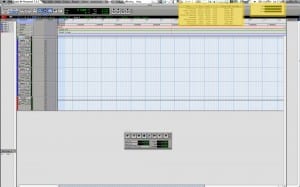
 My ProTools systems M-Powered, LE, and TDM all use the same editor layout which is shown in the image above. I recommend this layout to anyone using ProTools as you can see all the most relevant information at a glance, and get to inserts quickly as possible. If you can’t see the inserts column on your screen click on the icon shown by the red block, this icon is the same on all versions of ProTools, however it could be in a different place. Once you click this a menu will appear with some options, click on inserts and the column will appear. To enable the system usage and disk usage shown in yellow, go to the Window menu, at the bottom of that menu are two items Disk Space, and System Usage, if you click on these the boxes will appear.