This may seem like a pretty trivial thing to do for a moderate user of ProTools, however it is something that has cropped up time and time again with new users of the software. It isn’t the most obvious of things depending on which window you are viewing, and also which layout is being used. I will demonstrate the two most common ways to add a plug-in to a channel, and also the way to get the layout to reflect mine if it does not already. I am using ProTools M-Powered 7.3.1 in these images so you may see something slightly different if you are using ProTools 8, however the techniques are exactly the same.
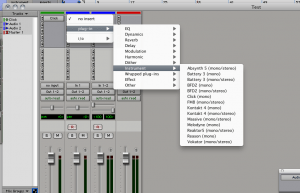
 The easiest way to add a plug-in to a channel is to use the Mixer window as you can access all of the inserts, input options, output options, levels, everything related to a channel with the exception of the actual audio. With the mixer window open click on the arrow next to an insert as shown in the image.
As you can see I have chosen to add a plug-in to the Audio 1 channel which is a mono channel, if you have selected a stereo channel then you will see some slightly different options where plug-in is displayed in these menus however they are very obvious what they mean. The next thing to realize is that the plug-ins in these lists are all RTAS plug-ins, you can not add an Audiosuite plug-in directly this way and they process the track at once, not in real-time as RTAS plug-ins do. The difference is explained in another post on here so I will not go into that in this post, if you don’t understand the difference and what should be used where, please have a look at “The ProTools plug-ins mystery solved” post.
Once you have this menu open you are free to select a plug-in from the list, and begin using it in the window it opens itself. Once you close the window the plug-in doesn’t go away it is still there and to get back to it all you need to do is to click on it’s name in the box on the channel, for example if I wanted to alter the click properties on the Click track, I would click on the box labeled Click, which would bring up the properties for the Click plug-in for me to alter.
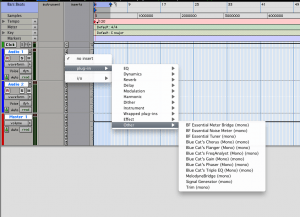
 The second way of adding an RTAS plug-in to a channel is from the editor window. This is just as simple as long as the inserts panel is visible on your system, if it is not it is not hard to show the panel and I explain this in “Setting up the ProTools environment best practices” post on this blog. Shown in the image is the second location for the inserts panel in ProTools. This can be an easier place for you if you don’t use a dual-screen setup as it is quick to get to while you are editing the audio, and also if you spot something that doesn’t sound quite right and you can see where it is in the waveform the plug-ins are within easy reach.
Those are the two methods of adding an RTAS plug-in to a channel.